


20 Aug 2023
11:05 pm
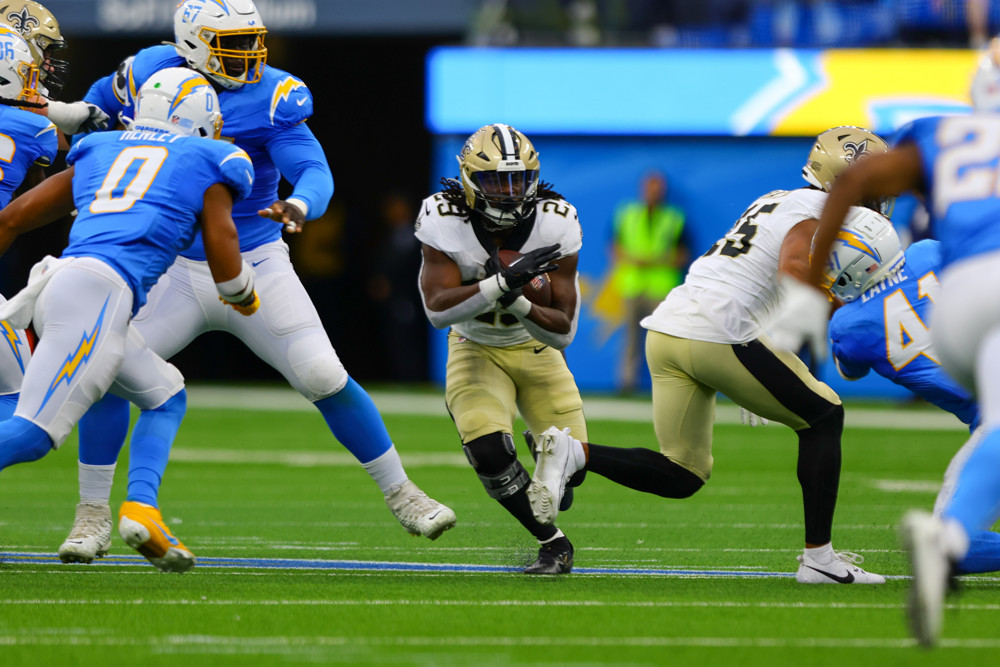
Final
New OrleansSaints

Saints
22
-
17
Chargers
Los AngelesChargers
| 1 | 2 | 3 | 4 | T | |
|
|
0 | 13 | 3 | 6 | 22 |
|
|
0 | 10 | 0 | 7 | 17 |
Players
New Orleans Saints
2

3

25
34

32
85

0

5
85

17

33

46

11

90

27

28

57

97
44

24

0

45

43

38

58

0
52

49
33

40

31

99

98

49

92

42

77

29

40

53
57

95
55

16

19

39

12

Los Angeles Chargers
2

28

42

25

86
0

1

84

48

12

83

84

44

89

46

38

0

53

37

41

52

38

36

22
33

91
0

72

24

67

99

45

39

92

90

23
54
0

46

59
7

11

16

Team Statistics
New Orleans Saints
Los Angeles Chargers
13
Total 1st Downs
19
8
Passing 1st Downs
10
4
Rushing 1st Downs
6
1
1st Downs from Penalties
3
5-17
3rd Down Efficiency
3-15
1-1
4th Down Efficiency
2-5
66
Total Plays
68
339
Total Yards
309
14
Yards per Play
13
5.1
Total Drives
4.5
278
Total Passing
189
24-38
Passing Comp-Att
21-41
7.0
Yards per Pass
4.1
0
Interceptions Thrown
2
2-9
Sacks-Yards Lost
5-44
61
Total Rushing
120
26
Rushing Attempts
22
2.3
Yards per Rush
5.5
1-5
Red Zone (Made-Att)
2-3
14-141
Penalties
5-26
0
Total Turnovers
3
0
Fumbles lost
1
0
Turnovers Interceptions
2
34:14
Possession
25:46
2
Total Interceptions
0
1
Fumbles Recovered
0
5
Total Sacks
2
0
Total Safeties
0
17
Points Against
22
0
Int Touchdowns
0
Players Statistics
New Orleans Saints
| Passing | C/Att | Yds | Avg | TD | Int | Sacks |
|---|---|---|---|---|---|---|
| Jameis Winston [QB] | 13/21 | 169 | 8.0 | 0 | 0 | 2-9 |
| Jake Haener [QB] | 11/17 | 118 | 6.9 | 0 | 0 | 0-0 |
| Rushing | Yds | Att | TD | Lng |
|---|---|---|---|---|
| Darrel Williams [RB] | 17 | 8 | 0 | 4 |
| Jontre Kirklin [WR] | 8 | 1 | 0 | 8 |
| Jake Haener [QB] | -2 | 2 | 0 | -1 |
| Kendre Miller [RB] | 23 | 10 | 1 | 9 |
| Ellis Merriweather [RB] | 15 | 5 | 0 | 6 |
| Receiving | Tgts | Rec | Yds | Lng | TD |
|---|---|---|---|---|---|
| Lucas Krull [TE] | 8 | 3 | 30 | 15 | 0 |
| Lynn Bowden Jr. [WR] | 3 | 2 | 37 | 32 | 0 |
| Bryan Edwards [WR] | 4 | 0 | 0 | 0 | 0 |
| Darrel Williams [RB] | 1 | 1 | 4 | 4 | 0 |
| Adam Prentice [FB] | 1 | 1 | 2 | 2 | 0 |
| Kirk Merritt [WR] | 1 | 1 | 8 | 8 | 0 |
| Jontre Kirklin [WR] | 3 | 3 | 59 | 53 | 0 |
| A.T. Perry [WR] | 5 | 3 | 22 | 9 | 0 |
| Shaquan Davis [WR] | 5 | 3 | 63 | 42 | 0 |
| Kendre Miller [RB] | 3 | 3 | 36 | 27 | 0 |
| Ellis Merriweather [RB] | 4 | 4 | 26 | 12 | 0 |
| Fumbles | Fum |
|---|---|
| Bryan Bresee [DT] | 0 |
| Interceptions | Int | Yds | TD |
|---|---|---|---|
| Lonnie Johnson [CB] | 1 | 5 | 0 |
| Isaac Yiadom [CB] | 1 | 19 | 0 |
| Tackles | Tckl | Solo | Sck |
|---|---|---|---|
| Bradley Roby [CB] | 2 | 2 | 0 |
| Johnathan Abram [S] | 4 | 2 | 0 |
| Ty Summers [LB] | 1 | 1 | 0 |
| Jaylon Smith [LB] | 3 | 1 | 0 |
| Lonnie Johnson [CB] | 3 | 3 | 0 |
| Ugo Amadi [S] | 4 | 2 | 0 |
| Jack Heflin [DT] | 1 | 0 | 0 |
| Khalen Saunders [DT] | 2 | 1 | 0 |
| Prince Emili [DT] | 1 | 0 | 0 |
| Isaac Yiadom [CB] | 1 | 1 | 0 |
| Tanoh Kpassagnon [DE] | 1 | 1 | 0 |
| Malcolm Roach [DE] | 4 | 4 | 0 |
| Payton Turner [DE] | 1 | 1 | 1 |
| Zack Baun [LB] | 1 | 0 | 0 |
| D'Marco Jackson [LB] | 3 | 2 | 0 |
| Nephi Sewell [LB] | 4 | 1 | 0 |
| Paulson Adebo [CB] | 1 | 1 | 0 |
| Smoke Monday [S] | 3 | 3 | 0 |
| Zach Wood [LS] | 1 | 1 | 0 |
| Ryan Connelly [LB] | 3 | 3 | 1 |
| Niko Lalos [DE] | 5 | 4 | 3 |
| Troy Pride Jr. [CB] | 3 | 2 | 0 |
| Anfernee Orji [LB] | 3 | 3 | 0 |
| Jordan Howden [S] | 2 | 2 | 0 |
| Jerron Cage [DT] | 1 | 1 | 0 |
| Isaiah Foskey [DE] | 1 | 0 | 0 |
| Anthony Johnson [CB] | 2 | 2 | 0 |
| Nick Anderson [LB] | 1 | 1 | 0 |
| Adrian Frye [CB] | 4 | 3 | 0 |
| Bryan Bresee [DT] | 0 | 0 | 0 |
| Kick Returns | No | Yds | Lng | TD |
|---|---|---|---|---|
| Lynn Bowden Jr. [WR] | 2 | 41 | 21 | 0 |
| Kirk Merritt [WR] | 1 | 13 | 13 | 0 |
| Ellis Merriweather [RB] | 1 | 21 | 21 | 0 |
| Punt Returns | No | Yds | Lng | TD |
|---|---|---|---|---|
| Lynn Bowden Jr. [WR] | 3 | 13 | 13 | 0 |
| Ugo Amadi [S] | 1 | 17 | 17 | 0 |
| Kicking | FG | Lng | XPM | XPA | Pts |
|---|---|---|---|---|---|
| Wil Lutz [PK] | 3/3 | 51 | 0 | 0 | 9 |
| Blake Grupe [PK] | 2/2 | 37 | 1 | 1 | 7 |
| Punting | No | Yds | TB | in20 | Lng |
|---|---|---|---|---|---|
| Blake Gillikin [P] | 2 | 90 | 0 | 1 | 47 |
| Lou Hedley [P] | 5 | 221 | 0 | 2 | 49 |
Los Angeles Chargers
| Passing | C/Att | Yds | Avg | TD | Int | Sacks |
|---|---|---|---|---|---|---|
| Easton Stick [QB] | 21/41 | 233 | 5.7 | 0 | 2 | 5-44 |
| Rushing | Yds | Att | TD | Lng |
|---|---|---|---|---|
| Easton Stick [QB] | 63 | 7 | 2 | 21 |
| Joshua Kelley [RB] | 9 | 4 | 0 | 5 |
| Isaiah Spiller [RB] | 27 | 5 | 0 | 18 |
| Elijah Dotson [RB] | 21 | 6 | 0 | 8 |
| Receiving | Tgts | Rec | Yds | Lng | TD |
|---|---|---|---|---|---|
| Joshua Kelley [RB] | 1 | 1 | 5 | 5 | 0 |
| Hunter Kampmoyer [TE] | 2 | 2 | 25 | 14 | 0 |
| Donald Parham Jr. [TE] | 3 | 0 | 0 | 0 | 0 |
| Stone Smartt [TE] | 5 | 4 | 32 | 19 | 0 |
| Keelan Doss [WR] | 5 | 3 | 42 | 23 | 0 |
| John Hightower [WR] | 6 | 1 | 10 | 10 | 0 |
| Ontaria Wilson [WR] | 2 | 1 | 14 | 14 | 0 |
| Derius Davis [WR] | 3 | 3 | 24 | 10 | 0 |
| Quentin Johnston [WR] | 3 | 3 | 37 | 16 | 0 |
| Terrell Bynum [WR] | 4 | 1 | 39 | 39 | 0 |
| Michael Ezeike [TE] | 1 | 0 | 0 | 0 | 0 |
| Tyler Hoosman [RB] | 2 | 2 | 5 | 3 | 0 |
| Elijah Dotson [RB] | 3 | 0 | 0 | 0 | 0 |
| Milton Wright [WR] | 1 | 0 | 0 | 0 | 0 |
| Fumbles | Fum |
|---|---|
| Easton Stick [QB] | 1 |
| Derius Davis [WR] | 1 |
| Interceptions | Int | Yds | TD |
|---|
| Tackles | Tckl | Solo | Sck |
|---|---|---|---|
| Matt Hankins [CB] | 1 | 1 | 0 |
| Zander Horvath [FB] | 1 | 0 | 0 |
| Hunter Kampmoyer [TE] | 1 | 1 | 0 |
| Tre' McKitty [TE] | 1 | 0 | 0 |
| Stone Smartt [TE] | 1 | 1 | 0 |
| Carlo Kemp [LB] | 1 | 0 | 1 |
| Ty Shelby [LB] | 0 | 0 | 0 |
| Michael Jacquet [CB] | 2 | 1 | 0 |
| Deane Leonard [CB] | 3 | 2 | 0 |
| Ja'Sir Taylor [CB] | 3 | 2 | 0 |
| Raheem Layne [S] | 5 | 5 | 0 |
| JT Woods [S] | 3 | 2 | 0 |
| Christopher Hinton [DT] | 3 | 1 | 1 |
| Blake Lynch [LB] | 8 | 5 | 0 |
| David Moa [DT] | 3 | 1 | 0 |
| Tiawan Mullen [CB] | 6 | 5 | 0 |
| Cameron Brown [CB] | 3 | 3 | 0 |
| Terrell Bynum [WR] | 1 | 1 | 0 |
| Tuli Tuipulotu [LB] | 2 | 2 | 0 |
| AJ Finley [S] | 3 | 1 | 0 |
| Jerrod Clark [DT] | 3 | 1 | 0 |
| Mikel Jones [LB] | 5 | 3 | 0 |
| Daiyan Henley [LB] | 9 | 6 | 1 |
| Scott Matlock [DT] | 2 | 2 | 0 |
| Brevin Allen [LB] | 2 | 0 | 0 |
| CJ Okoye [DT] | 3 | 1 | 0 |
| Andrew Farmer [LB] | 2 | 1 | 0 |
| Kick Returns | No | Yds | Lng | TD |
|---|---|---|---|---|
| Derius Davis [WR] | 3 | 70 | 29 | 0 |
| Elijah Dotson [RB] | 1 | 22 | 22 | 0 |
| Punt Returns | No | Yds | Lng | TD |
|---|---|---|---|---|
| John Hightower [WR] | 2 | 5 | 5 | 0 |
| Derius Davis [WR] | 1 | 0 | 0 | 0 |
| Kicking | FG | Lng | XPM | XPA | Pts |
|---|---|---|---|---|---|
| Dustin Hopkins [PK] | 1/1 | 25 | 1 | 1 | 4 |
| Cameron Dicker [PK] | 0/0 | 0 | 1 | 1 | 1 |
| Punting | No | Yds | TB | in20 | Lng |
|---|---|---|---|---|---|
| JK Scott [P] | 5 | 254 | 0 | 1 | 54 |
Latest Games
New Orleans Saints
13 Aug 2023
5:00 pm
NFL 2023-2024 /
Preseason
/
Week1
Kansas CityChiefs

Chiefs
24
-
26
Saints
New OrleansSaints
Final
8 Jan 2023
6:00 pm
NFL 2022-2023 /
Regular Season
/
Week18
CarolinaPanthers

Panthers
10
-
7
Saints
New OrleansSaints
Final
1 Jan 2023
6:00 pm
NFL 2022-2023 /
Regular Season
/
Week17
New OrleansSaints
Saints
20
-
10

Eagles
PhiladelphiaEagles
Final

Los Angeles Chargers
13 Aug 2023
1:00 am
NFL 2023-2024 /
Preseason
/
Week1
Los AngelesChargers
Chargers
34
-
17

Rams
Los AngelesRams
Final
15 Jan 2023
1:15 am
NFL 2022-2023 /
Postseason
Los AngelesChargers
Chargers
30
-
31

Jaguars
JacksonvilleJaguars
Final
8 Jan 2023
9:25 pm
NFL 2022-2023 /
Regular Season
/
Week18
Los AngelesChargers
Chargers
28
-
31

Broncos
DenverBroncos
Final
Head to Head Games
Commentary
New Orleans Saints
Los Angeles Chargers
Touchdown
7-0
Kendre Miller 7 Yd Run (Blake Grupe Kick)
Q2 12:54
Q2 9:57
Field Goal
7-3
Dustin Hopkins 25 Yd Field Goal
Field Goal
10-3
Blake Grupe 35 Yd Field Goal
Q2 1:56
Q2 0:33
Touchdown
10-10
Easton Stick 6 Yd Run (Cameron Dicker Kick)
Field Goal
13-10
Blake Grupe 37 Yd Field Goal
Q2 0:00
Field Goal
16-10
Wil Lutz 33 Yd Field Goal
Q3 11:07
Field Goal
19-10
Wil Lutz 51 Yd Field Goal
Q4 14:15
Field Goal
22-10
Wil Lutz 34 Yd Field Goal
Q4 7:38
Q4 3:46
Touchdown
22-17
Easton Stick 1 Yd Run (Dustin Hopkins Kick)
