


29 Jan 2023
11:30 pm
Final
CincinnatiBengals

Bengals
20
-
23

Chiefs
Kansas CityChiefs
| 1 | 2 | 3 | 4 | T | |
|
|
0 | 6 | 7 | 7 | 20 |
|
|
3 | 10 | 7 | 3 | 23 |
Players
Cincinnati Bengals
9

25

28

5

1
83
81

84

16

94

24

57

33

55

3

21

58

98

68

29

95

96

91

51


17

49

48

23

92
59

32

15

2

4

Kansas City Chiefs
15

10

12

1

32

11

87

19

24
19
7

83

35

2

20

22
51
6

95

32

99

57

1

59

56

26

38

13

91

50
8

7

5

Team Statistics
Cincinnati Bengals
Kansas City Chiefs
18
Total 1st Downs
23
11
Passing 1st Downs
17
6
Rushing 1st Downs
3
1
1st Downs from Penalties
3
6-14
3rd Down Efficiency
7-14
1-1
4th Down Efficiency
1-1
63
Total Plays
66
309
Total Yards
357
11
Yards per Play
10
4.9
Total Drives
5.4
238
Total Passing
315
26-41
Passing Comp-Att
29-43
5.2
Yards per Pass
6.8
2
Interceptions Thrown
0
5-32
Sacks-Yards Lost
3-11
71
Total Rushing
42
17
Rushing Attempts
20
4.2
Yards per Rush
2.1
1-3
Red Zone (Made-Att)
2-3
9-71
Penalties
4-55
2
Total Turnovers
1
0
Fumbles lost
1
2
Turnovers Interceptions
0
27:09
Possession
32:51
0
Total Interceptions
2
1
Fumbles Recovered
0
3
Total Sacks
5
0
Total Safeties
0
23
Points Against
20
0
Int Touchdowns
0
Players Statistics
Cincinnati Bengals
| Passing | C/Att | Yds | Avg | TD | Int | Sacks |
|---|---|---|---|---|---|---|
| Joe Burrow [QB] | 26/41 | 270 | 6.6 | 1 | 2 | 5-32 |
| Rushing | Yds | Att | TD | Lng |
|---|---|---|---|---|
| Joe Burrow [QB] | 30 | 4 | 0 | 14 |
| Joe Mixon [RB] | 19 | 8 | 0 | 7 |
| Samaje Perine [RB] | 22 | 5 | 1 | 7 |
| Receiving | Tgts | Rec | Yds | Lng | TD |
|---|---|---|---|---|---|
| Joe Mixon [RB] | 3 | 3 | 15 | 6 | 0 |
| Tyler Boyd [WR] | 2 | 2 | 40 | 24 | 0 |
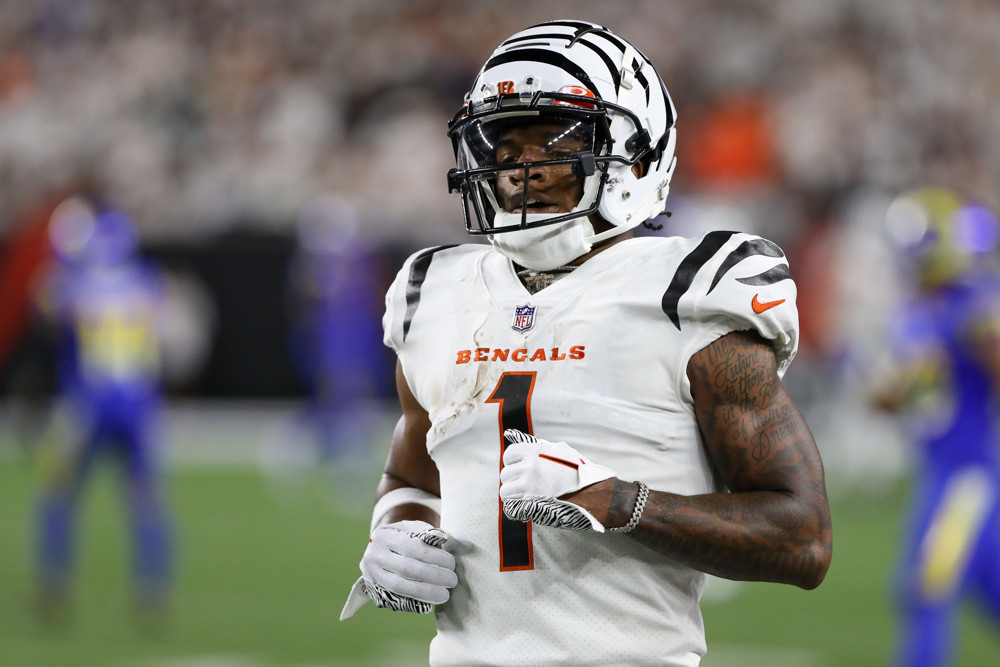
| Ja'Marr Chase [WR] | 8 | 6 | 75 | 35 | 0 |
| Tee Higgins [WR] | 11 | 6 | 83 | 27 | 1 |
| Mitchell Wilcox [TE] | 2 | 1 | 10 | 10 | 0 |
| Trenton Irwin [WR] | 2 | 1 | 6 | 6 | 0 |
| Samaje Perine [RB] | 4 | 3 | 4 | 4 | 0 |
| Hayden Hurst [TE] | 5 | 4 | 37 | 23 | 0 |
| Fumbles | Fum |
|---|---|
| Sam Hubbard [DE] | 0 |
| Interceptions | Int | Yds | TD |
|---|
| Tackles | Tckl | Solo | Sck |
|---|---|---|---|
| Tee Higgins [WR] | 1 | 1 | 0 |
| Stanley Morgan [WR] | 1 | 1 | 0 |
| Trey Hendrickson [DE] | 2 | 1 | 0 |
| Sam Hubbard [DE] | 2 | 1 | 1 |
| Joseph Ossai [DE] | 5 | 3 | 0 |
| Cam Sample [DE] | 2 | 2 | 1 |
| Zach Carter [DT] | 3 | 0 | 0 |
| BJ Hill [DT] | 1 | 0 | 0 |
| DJ Reader [DT] | 4 | 1 | 0 |
| Josh Tupou [DT] | 3 | 1 | 0 |
| Joe Bachie [LB] | 1 | 1 | 0 |
| Markus Bailey [LB] | 2 | 1 | 0 |
| Akeem Davis-Gaither [LB] | 1 | 0 | 0 |
| Germaine Pratt [LB] | 7 | 2 | 0 |
| Logan Wilson [LB] | 6 | 5 | 0 |
| Mike Hilton [CB] | 5 | 4 | 0 |
| Cam Taylor-Britt [CB] | 3 | 1 | 0 |
| Dax Hill [S] | 1 | 1 | 0 |
| Cal Adomitis [LS] | 1 | 1 | 0 |
| Eli Apple [CB] | 6 | 5 | 0 |
| Jessie Bates III [S] | 6 | 3 | 0 |
| Hayden Hurst [TE] | 1 | 1 | 0 |
| Vonn Bell [S] | 7 | 5 | 0 |
| Team | 1 | 1 | 1 |
| Kick Returns | No | Yds | Lng | TD |
|---|---|---|---|---|
| Trayveon Williams [RB] | 2 | 46 | 29 | 0 |
| Trent Taylor [WR] | 0 | 2 | 2 | 0 |
| Trenton Irwin [WR] | 1 | 8 | 8 | 0 |
| Punt Returns | No | Yds | Lng | TD |
|---|---|---|---|---|
| Trent Taylor [WR] | 1 | 5 | 5 | 0 |
| Kicking | FG | Lng | XPM | XPA | Pts |
|---|---|---|---|---|---|
| Evan McPherson [PK] | 2/2 | 30 | 2 | 2 | 8 |
| Punting | No | Yds | TB | in20 | Lng |
|---|---|---|---|---|---|
| Drue Chrisman [P] | 4 | 196 | 0 | 0 | 54 |
Kansas City Chiefs
| Passing | C/Att | Yds | Avg | TD | Int | Sacks |
|---|---|---|---|---|---|---|
| Patrick Mahomes [QB] | 29/43 | 326 | 7.6 | 2 | 0 | 3-11 |
| Rushing | Yds | Att | TD | Lng |
|---|---|---|---|---|
| Mecole Hardman [WR] | 7 | 2 | 0 | 5 |
| Patrick Mahomes [QB] | 8 | 3 | 0 | 5 |
| Jerick McKinnon [RB] | 1 | 4 | 0 | 4 |
| Isiah Pacheco [RB] | 26 | 10 | 0 | 6 |
| Ronald Jones [RB] | 0 | 1 | 0 | 0 |
| Receiving | Tgts | Rec | Yds | Lng | TD |
|---|---|---|---|---|---|
| Mecole Hardman [WR] | 3 | 2 | 10 | 11 | 0 |
| JuJu Smith-Schuster [WR] | 1 | 1 | 7 | 7 | 0 |
| Marcus Kemp [WR] | 1 | 1 | 13 | 13 | 0 |
| Kadarius Toney [WR] | 2 | 1 | 9 | 9 | 0 |
| Jerick McKinnon [RB] | 4 | 2 | 17 | 13 | 0 |
| Isiah Pacheco [RB] | 6 | 5 | 59 | 18 | 0 |
| Skyy Moore [WR] | 7 | 3 | 13 | 8 | 0 |
| Marquez Valdes-Scantling [WR] | 8 | 6 | 116 | 29 | 1 |
| Noah Gray [TE] | 1 | 1 | 4 | 4 | 0 |
| Travis Kelce [TE] | 8 | 7 | 78 | 16 | 1 |
| Fumbles | Fum |
|---|---|
| Patrick Mahomes [QB] | 1 |
| Jerick McKinnon [RB] | 0 |
| Travis Kelce [TE] | 1 |
| Interceptions | Int | Yds | TD |
|---|---|---|---|
| Jaylen Watson [CB] | 1 | 10 | 0 |
| Joshua Williams [CB] | 1 | -4 | 0 |
| Tackles | Tckl | Solo | Sck |
|---|---|---|---|
| Juan Thornhill [S] | 3 | 2 | 0 |
| Frank Clark [LB] | 3 | 2 | 2 |
| Khalen Saunders [DT] | 3 | 3 | 0 |
| Mike Danna [DE] | 5 | 3 | 0 |
| George Karlaftis [DE] | 1 | 1 | 1 |
| Chris Jones [DT] | 4 | 3 | 2 |
| Derrick Nnadi [DT] | 1 | 0 | 0 |
| Nick Bolton [LB] | 4 | 1 | 0 |
| Willie Gay [LB] | 1 | 0 | 1 |
| Trent McDuffie [CB] | 6 | 6 | 0 |
| L'Jarius Sneed [CB] | 1 | 1 | 0 |
| Jaylen Watson [CB] | 4 | 4 | 0 |
| Joshua Williams [CB] | 5 | 4 | 0 |
| Deon Bush [S] | 1 | 1 | 0 |
| Bryan Cook [S] | 4 | 4 | 0 |
| Justin Reid [S] | 7 | 7 | 0 |
| Carlos Dunlap [DE] | 0 | 0 | 0 |
| Darius Harris [LB] | 2 | 1 | 0 |
| Nazeeh Johnson [S] | 1 | 1 | 0 |
| Kick Returns | No | Yds | Lng | TD |
|---|---|---|---|---|
| Isiah Pacheco [RB] | 2 | 45 | 23 | 0 |
| Skyy Moore [WR] | 1 | 18 | 18 | 0 |
| Punt Returns | No | Yds | Lng | TD |
|---|---|---|---|---|
| Kadarius Toney [WR] | 1 | 12 | 12 | 0 |
| Skyy Moore [WR] | 2 | 29 | 29 | 0 |
| Kicking | FG | Lng | XPM | XPA | Pts |
|---|---|---|---|---|---|
| Harrison Butker [PK] | 3/3 | 45 | 2 | 2 | 11 |
| Punting | No | Yds | TB | in20 | Lng |
|---|---|---|---|---|---|
| Tommy Townsend [P] | 4 | 151 | 0 | 3 | 44 |
Latest Games
Cincinnati Bengals
22 Jan 2023
8:00 pm
NFL 2022-2023 /
Postseason
CincinnatiBengals
Bengals
27
-
10

Bills
BuffaloBills
Final
16 Jan 2023
1:15 am
NFL 2022-2023 /
Postseason
BaltimoreRavens

Ravens
17
-
24
Bengals
CincinnatiBengals
Final
8 Jan 2023
6:00 pm
NFL 2022-2023 /
Regular Season
/
Week18
BaltimoreRavens
Ravens
16
-
27
Bengals
CincinnatiBengals
Final


Kansas City Chiefs
21 Jan 2023
9:30 pm
NFL 2022-2023 /
Postseason
JacksonvilleJaguars

Jaguars
20
-
27
Chiefs
Kansas CityChiefs
Final
7 Jan 2023
9:30 pm
NFL 2022-2023 /
Regular Season
/
Week18
Kansas CityChiefs
Chiefs
31
-
13

Raiders
Las VegasRaiders
Final
1 Jan 2023
6:00 pm
NFL 2022-2023 /
Regular Season
/
Week17
DenverBroncos

Broncos
24
-
27
Chiefs
Kansas CityChiefs
Final


Head to Head Games
Commentary
Cincinnati Bengals
Kansas City Chiefs
Q1 8:50
Field Goal
0-3
Harrison Butker 43 Yd Field Goal
Q2 14:58
Field Goal
0-6
Harrison Butker 24 Yd Field Goal
Field Goal
3-6
Evan McPherson 30 Yd Field Goal
Q2 8:36
Q2 3:53
Touchdown
3-13
Travis Kelce 14 Yd pass from Patrick Mahomes (Harrison Butker Kick)
Field Goal
6-13
Evan McPherson 23 Yd Field Goal
Q2 0:00
Touchdown
13-13
Tee Higgins 27 Yd pass from Joe Burrow (Evan McPherson Kick)
Q3 9:54
Q3 4:15
Touchdown
13-20
Marquez Valdes-Scantling 19 Yd pass from Patrick Mahomes (Harrison Butker Kick)
Touchdown
20-20
Samaje Perine 2 Yd Run (Evan McPherson Kick)
Q4 13:30
Q4 0:03
Field Goal
20-23
Harrison Butker 45 Yd Field Goal
