


10 Sep 2023
5:00 pm
Final
CarolinaPanthers

Panthers
10
-
24

Falcons
AtlantaFalcons
| 1 | 2 | 3 | 4 | T | |
|
|
0 | 7 | 3 | 0 | 10 |
|
|
0 | 7 | 3 | 14 | 24 |
Players
Carolina Panthers
9
6
30

5
81

88

15

19

45

95
0
49

21

7

23

96

24

91

99

52

25

13

26

42

82

8

11

4

10

Atlanta Falcons
9

25

7
8

18

5

0

3

44

55

33

27
20
24

90
97

96

48

94

93

46

16

40

33

17

95
6

13

Team Statistics
Carolina Panthers
Atlanta Falcons
20
Total 1st Downs
13
9
Passing 1st Downs
6
9
Rushing 1st Downs
7
2
1st Downs from Penalties
0
5-14
3rd Down Efficiency
2-10
0-2
4th Down Efficiency
0-0
72
Total Plays
48
281
Total Yards
221
12
Yards per Play
13
3.9
Total Drives
4.6
127
Total Passing
91
20-38
Passing Comp-Att
15-18
3.2
Yards per Pass
4.1
2
Interceptions Thrown
0
2-19
Sacks-Yards Lost
4-24
154
Total Rushing
130
32
Rushing Attempts
26
4.8
Yards per Rush
5.0
1-2
Red Zone (Made-Att)
3-3
9-66
Penalties
6-43
3
Total Turnovers
0
1
Fumbles lost
0
2
Turnovers Interceptions
0
34:41
Possession
25:19
0
Total Interceptions
2
0
Fumbles Recovered
1
4
Total Sacks
2
0
Total Safeties
0
24
Points Against
10
0
Int Touchdowns
0
Players Statistics
Carolina Panthers
| Passing | C/Att | Yds | Avg | TD | Int | Sacks |
|---|---|---|---|---|---|---|
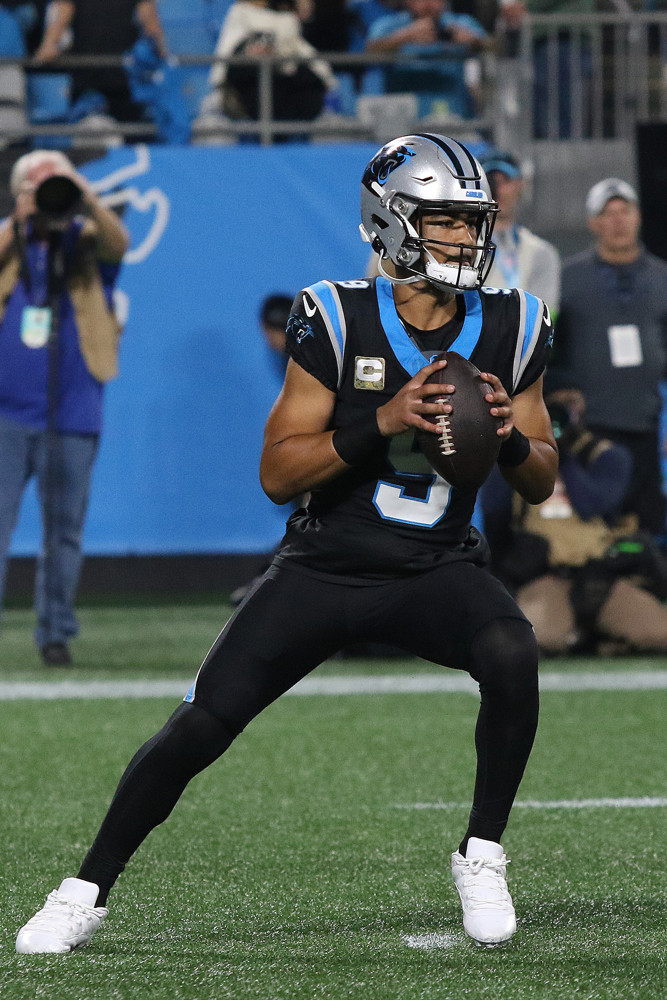
| Bryce Young [QB] | 20/38 | 146 | 3.8 | 1 | 2 | 2-19 |
| Rushing | Yds | Att | TD | Lng |
|---|---|---|---|---|
| Miles Sanders [RB] | 72 | 18 | 0 | 10 |
| Chuba Hubbard [RB] | 60 | 9 | 0 | 21 |
| Laviska Shenault Jr. [WR] | 5 | 2 | 0 | 5 |
| Bryce Young [QB] | 17 | 3 | 0 | 16 |
| Receiving | Tgts | Rec | Yds | Lng | TD |
|---|---|---|---|---|---|
| Hayden Hurst [TE] | 7 | 5 | 41 | 14 | 1 |
| Miles Sanders [RB] | 6 | 4 | 26 | 11 | 0 |
| Chuba Hubbard [RB] | 2 | 2 | 9 | 7 | 0 |
| Giovanni Ricci [TE] | 1 | 1 | 2 | 2 | 0 |
| Terrace Marshall Jr. [WR] | 6 | 2 | 23 | 12 | 0 |
| Laviska Shenault Jr. [WR] | 2 | 2 | 16 | 14 | 0 |
| Adam Thielen [WR] | 2 | 2 | 12 | 9 | 0 |
| Jonathan Mingo [WR] | 5 | 2 | 17 | 9 | 0 |
| Fumbles | Fum |
|---|---|
| Miles Sanders [RB] | 1 |
| Bryce Young [QB] | 1 |
| Interceptions | Int | Yds | TD |
|---|
| Tackles | Tckl | Solo | Sck |
|---|---|---|---|
| Justin Houston [LB] | 2 | 1 | 0 |
| Vonn Bell [S] | 3 | 2 | 0 |
| Terrace Marshall Jr. [WR] | 1 | 1 | 0 |
| Tommy Tremble [TE] | 1 | 1 | 0 |
| Brian Burns [LB] | 7 | 4 | 2 |
| Derrick Brown [DT] | 9 | 8 | 1 |
| Frankie Luvu [LB] | 7 | 3 | 1 |
| Shaq Thompson [LB] | 5 | 3 | 0 |
| CJ Henderson [CB] | 3 | 3 | 0 |
| Jaycee Horn [CB] | 1 | 0 | 0 |
| Donte Jackson [CB] | 1 | 1 | 0 |
| Jeremy Chinn [S] | 7 | 3 | 0 |
| Sam Franklin Jr. [S] | 1 | 1 | 0 |
| Xavier Woods [S] | 2 | 1 | 0 |
| Shy Tuttle [DT] | 3 | 0 | 1 |
| DeShawn Williams [DT] | 3 | 2 | 0 |
| Troy Hill [CB] | 1 | 1 | 0 |
| Nick Thurman [DE] | 3 | 1 | 0 |
| Jonathan Mingo [WR] | 1 | 1 | 0 |
| Kick Returns | No | Yds | Lng | TD |
|---|
| Punt Returns | No | Yds | Lng | TD |
|---|---|---|---|---|
| Ihmir Smith-Marsette [WR] | 3 | 14 | 13 | 0 |
| Kicking | FG | Lng | XPM | XPA | Pts |
|---|---|---|---|---|---|
| Eddy Pineiro [PK] | 1/1 | 43 | 1 | 1 | 4 |
| Punting | No | Yds | TB | in20 | Lng |
|---|---|---|---|---|---|
| Johnny Hekker [P] | 5 | 266 | 0 | 1 | 69 |
Atlanta Falcons
| Passing | C/Att | Yds | Avg | TD | Int | Sacks |
|---|---|---|---|---|---|---|
| Desmond Ridder [QB] | 15/18 | 115 | 6.4 | 1 | 0 | 4-24 |
| Rushing | Yds | Att | TD | Lng |
|---|---|---|---|---|
| Desmond Ridder [QB] | -1 | 1 | 0 | -1 |
| Tyler Allgeier [RB] | 75 | 15 | 2 | 22 |
| Bijan Robinson [RB] | 56 | 10 | 0 | 21 |
| Receiving | Tgts | Rec | Yds | Lng | TD |
|---|---|---|---|---|---|
| Mack Hollins [WR] | 4 | 3 | 31 | 11 | 0 |
| Desmond Ridder [QB] | 1 | 1 | -6 | -6 | 0 |
| Tyler Allgeier [RB] | 3 | 3 | 19 | 12 | 0 |
| Drake London [WR] | 1 | 0 | 0 | 0 | 0 |
| Kyle Pitts [TE] | 3 | 2 | 44 | 34 | 0 |
| Bijan Robinson [RB] | 6 | 6 | 27 | 17 | 1 |
| Fumbles | Fum |
|---|---|
| Desmond Ridder [QB] | 1 |
| Lorenzo Carter [LB] | 0 |
| Interceptions | Int | Yds | TD |
|---|---|---|---|
| Jessie Bates III [S] | 2 | 3 | 0 |
| Tackles | Tckl | Solo | Sck |
|---|---|---|---|
| Calais Campbell [DT] | 1 | 1 | 0 |
| Bud Dupree [LB] | 3 | 0 | 0 |
| Keith Smith [FB] | 1 | 0 | 0 |
| Parker Hesse [TE] | 1 | 1 | 0 |
| Arnold Ebiketie [LB] | 1 | 0 | 0 |
| Grady Jarrett [DE] | 3 | 1 | 1 |
| Ta'Quon Graham [DT] | 1 | 0 | 0 |
| Troy Andersen [LB] | 10 | 3 | 1 |
| Lorenzo Carter [LB] | 2 | 2 | 1 |
| Dee Alford [CB] | 6 | 4 | 0 |
| A.J. Terrell [CB] | 4 | 3 | 0 |
| Richie Grant [S] | 7 | 3 | 0 |
| Tre Flowers [CB] | 8 | 4 | 0 |
| Jessie Bates III [S] | 10 | 5 | 0 |
| Scotty Miller [WR] | 1 | 1 | 0 |
| Albert Huggins [DT] | 2 | 0 | 0 |
| David Onyemata [DT] | 4 | 2 | 0 |
| Kaden Elliss [LB] | 9 | 6 | 0 |
| Tae Davis [LB] | 1 | 0 | 0 |
| Zach Harrison [DE] | 3 | 1 | 0 |
| Kick Returns | No | Yds | Lng | TD |
|---|
| Punt Returns | No | Yds | Lng | TD |
|---|---|---|---|---|
| Dee Alford [CB] | 1 | 0 | 0 | 0 |
| Scotty Miller [WR] | 1 | 4 | 4 | 0 |
| Kicking | FG | Lng | XPM | XPA | Pts |
|---|---|---|---|---|---|
| Younghoe Koo [PK] | 1/1 | 49 | 3 | 3 | 6 |
| Punting | No | Yds | TB | in20 | Lng |
|---|---|---|---|---|---|
| Bradley Pinion [P] | 7 | 337 | 0 | 3 | 60 |
Latest Games
Carolina Panthers
26 Aug 2023
12:00 am
NFL 2023-2024 /
Preseason
/
Week3
DetroitLions
Lions
26
-
17
Panthers
CarolinaPanthers
Final
18 Aug 2023
11:00 pm
NFL 2023-2024 /
Preseason
/
Week2
CarolinaPanthers
Panthers
19
-
21

Giants
New YorkGiants
Final
12 Aug 2023
8:00 pm
NFL 2023-2024 /
Preseason
/
Week1
New YorkJets

Jets
27
-
0
Panthers
CarolinaPanthers
Final


Atlanta Falcons
24 Aug 2023
11:30 pm
NFL 2023-2024 /
Preseason
/
Week3
PittsburghSteelers

Steelers
24
-
0
Falcons
AtlantaFalcons
Final
18 Aug 2023
11:30 pm
NFL 2023-2024 /
Preseason
/
Week2
CincinnatiBengals

Bengals
13
-
13
Falcons
AtlantaFalcons
Final
11 Aug 2023
11:00 pm
NFL 2023-2024 /
Preseason
/
Week1
AtlantaFalcons
Falcons
19
-
3
Dolphins
MiamiDolphins
Final

Head to Head Games
11 Nov 2022
1:15 am
NFL 2022-2023 /
Regular Season
/
Week10
AtlantaFalcons
Falcons
15
-
25
Panthers
CarolinaPanthers
Final
30 Oct 2022
5:00 pm
NFL 2022-2023 /
Regular Season
/
Week8
CarolinaPanthers
Panthers
34
-
37
Falcons
AtlantaFalcons
Final
Commentary
Carolina Panthers
Atlanta Falcons
Q2 14:54
Touchdown
0-7
Bijan Robinson 11 Yd pass from Desmond Ridder (Younghoe Koo Kick)
Touchdown
7-7
Hayden Hurst 4 Yd pass from Bryce Young (Eddy Pineiro Kick)
Q2 5:09
Field Goal
10-7
Eddy Pineiro 43 Yd Field Goal
Q3 10:46
Q3 4:52
Field Goal
10-10
Younghoe Koo 49 Yd Field Goal
Q4 14:12
Touchdown
10-17
Tyler Allgeier 3 Yd Run (Younghoe Koo Kick)
Q4 4:48
Touchdown
10-24
Tyler Allgeier 3 Yd Run (Younghoe Koo Kick)